The Importance of Purpose
In my experience, there’s one commonly forgotten piece of learning when it comes to young learners: why. It’s a bit strange to think we have to explain ourselves to kids and why they have to learn something. After all, we are adults and we know what is best for our children. However, children see things differently. Children understand when they are being respected and when they are not being respected.Treat a child like a child, and you will find yourself with a rebel. Show them some equality and treat them as if they were individuals with their own opinions, and you’ll find yourself with a way better attitude for success.
If a child is unsure of the purpose of learning something they’re less likely to recall that information in the future. It’s important to reinforce the purpose of what they are learning in terms they can understand, and the first step of that is to make sure you treat them like individuals with their own feelings and ideas. A simple way of doing this is to show them the “why” for something they need to do.
About 6 years ago, I had an unruly classroom of first graders. It was my first time teaching an age group that young and I couldn’t get them to go along with the flow of the lesson, or even encourage participation until I spoke to some colleagues about it. They helped me to establish a goal-oriented learning lesson structure. This goal was part of the “Why” these kids needed, and once I began explaining why they were learning something, their participation shot through the roof. No more classroom disruptions, and almost 100% participation from the class. I pushed this style of lesson design towards all of my future classes in every grade I’ve taught, and I’ve seen the same results in them as well. If it works on a room of 30 kids, it’ll definitely work even better on your kids.
When you are starting something new with your child, always ask yourself: “Why does my child need this?” or “Why does my child have to learn this?”. Odds are if you can’t answer that question, neither can they. Additionally, if you are able to answer the question, think to yourself whether or not your explanation can be applied to and understood by your child.
Let’s take percentages as an example.
There are two types of ways to explain something to your children. The most common one I see parents try is explaining something by how they understand it. The less common one is to explain something by how their children can understand it.
One reason it’s important to learn percentages is to understand tax and the extra amount of money you pay when purchasing something. However, when explaining percentages to your child using taxes, you’ve introduced another new concept to them: taxes. You’ll end up overcomplicating the topic and probably send them further into confusion. This is an example of an adult explaining something by how they understand it.
Now, another way you could explain it: it’s pretty common for your child to have tests in school. If you explain that percentages are how much out of everything they got correct or incorrect is, then it is a relatable and easy to understand example for your children. This is an example of an explanation that can be used for your child because first, it’s relatable to them: they take tests. Second, it’s simple to understand : how much of the whole is defined by something (IE Correct or Incorrect). You can use this as the starting point and can deepen understanding of the concept of percentages by having your kids point out what percentages they see in day to day life, such as in the supermarket and asking them to identify what each percentage represents.
When you take the time to teach your children, it’s important to not just give them a worksheet and say good luck. It’s also important to not just tell them to learn something for the sake of learning. Instead, make sure your child understands what they are learning by adding some of the why they are learning. Part of the responsibility lies on you for encouraging their success by making sure you package what they are learning into something they can relate to and also maybe even take an interest in it. Try it out with your kids and see how their attitudes change!
Starting from the first grade and up, your child will be exposed to area and perimeter. Area and perimeter problems are divided into multiple types of problems but the one they will most likely see first are grid format perimeter problems.
Perimeter refers to the length of a line that encloses a shape. In other words, it’s the length of all sides of a shape. There are a variety of formulas that can be remembered to speed up the process of calculating perimeter early-on, but once your child reaches a certain stage, those formulas will actually complicate the problem and make the solution much more difficult to find. We recommend teaching them one simple method of finding perimeter:
Add all the lengths of the sides together.
This can be performed early-on when your child is just learning perimeter, and also applied in the future when they encounter much more complex perimeter problems.
Perimeter problems are subdivided into multiple categories, but since this is the first step in getting your child to become an expert in learning perimeter, we’ll go over the most basic form – grid format perimeter problems.
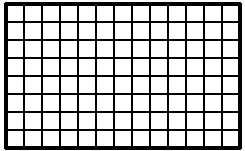
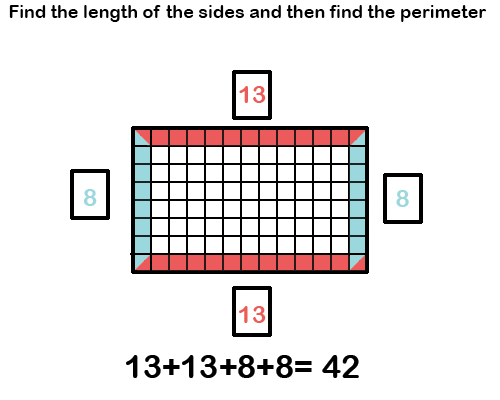
A grid format perimeter problem refers to a problem that has a shape with grids. Each box within the grid denotes a single unit of length. Look at the example below to get a better idea:
From this one example, there are a variety of questions that can be asked. We’ll go over each
one together.
Problem Type 1)
Find the lengths of all sides, and then the perimeter of the shape.
This problem has two steps that need to be completed: First, the length of the sides needs to be found, then you can use those numbers to find the perimeter.
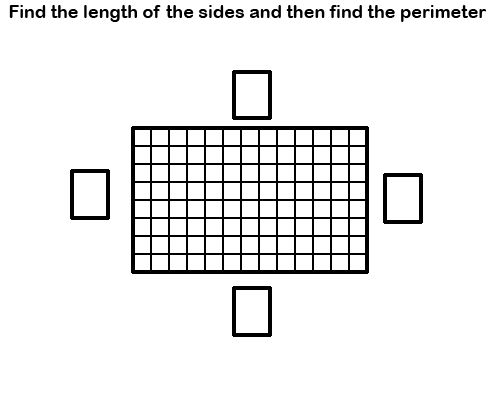
To find the length of a side when you have a grid, all you have to do is count the grid squares attached to each side. We’ve colored the corners with 2 colors to show that they apply for the lengths of both sides they are attached to.
Once you finish counting, then you should have the length of each side
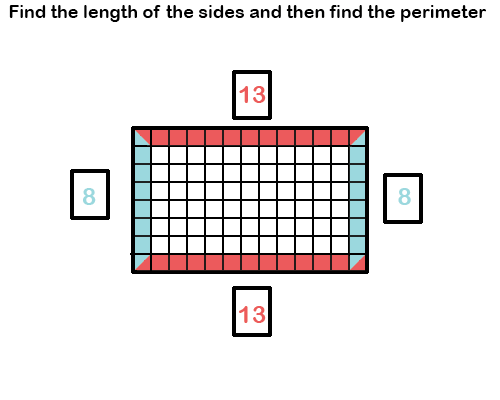
Now you just take each length and all them all together.
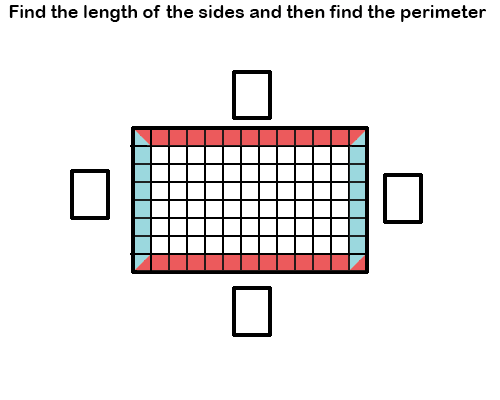
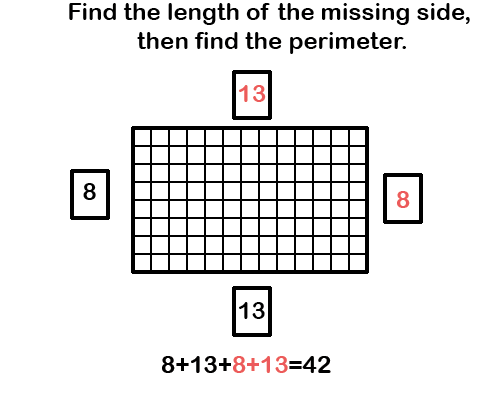
Problem Type 2) Missing Length Perimeter Grid
Find the length of the missing side, then find the perimeter of the shape.
This problem differs slightly from the first problem type in that you are given some of the side lengths, but not all. The common approach most people take to this is “The lengths of the horizontal lines are equal, and the lengths of the vertical lines are equal” which is actually an ideal approach as it will help to set your child up for more difficult problems in the future.
This problem, like the one above, has two steps: first, find the length of the missing side, and then you can find the perimeter.
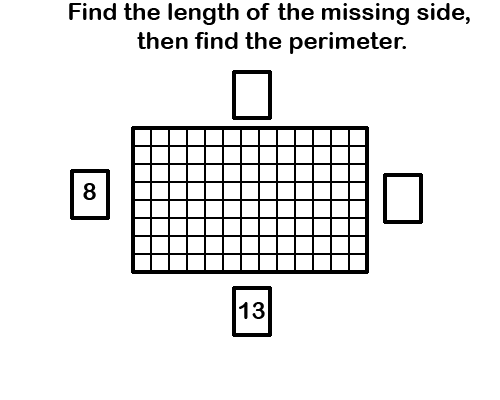
Your child can take two approaches here:
- Count the grid boxes and find the length of the side (like we did above)
- Use the equal sides rule
Since we’ve already covered how to do approach one, let’s look at approach 2 in this problem.
Because we know this shape is a rectangle, and rectangles have equal heights and lengths, we can apply that knowledge to define the missing lengths.
We are given a height of 8 and a length of 13, so we know the missing height and missing length should also be the same respective numbers, giving us this solution below:
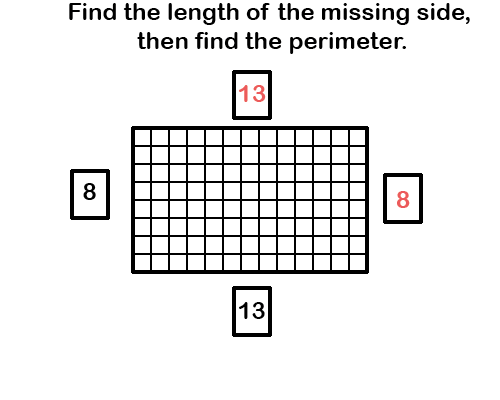
Then we follow the same steps by adding up the lengths of all sides, and we should find our perimeter
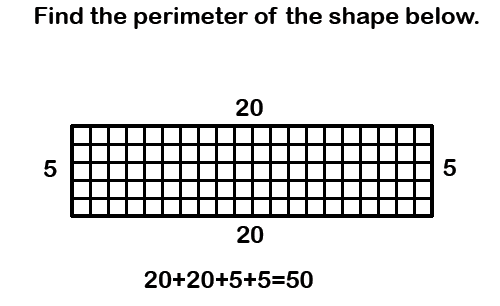
Problem Type 3) Just Finding Perimeter
The last problem is relatively simple compared to the other two. The problem is already set up so that your child has the length of all sides and they would just need to add up all the length values to find the perimeter.
Perimeter problem types are not just limited to the ones we have shown here. Over the course of the next few blog posts, we’ll be posting about more difficult and complex perimeter problems.
Check out our worksheet below for more practice with your child!
Grid Perimeter Worksheet
Grid Perimeter Worksheet – Answer Key
Modelling Numbers
There is an interesting way of teaching numbers to children in our schools. If we really think about it, numbers are just characters. They have no values by themselves, but instead are attached value. It’s similar to a $100 bill and a $1 bill. We know that the $100 bill is worth more because it is a larger value, but we also understand that $100 can buy more things than $1.
A young learner just being introduced to numbers has to develop their understanding of numbers just as we may have forgotten that we did in the past. They have to learn the values of numbers, and usually this is done by representations of numbers using models. One common example is math problems involving cookies. You give a child two sets of cookies: one set has 4 cookies, the other set has 1 cookie. You don’t directly ask which set has more cookies but instead you attach some relatable knowledge they have by asking questions such as “Which set of cookies do you want to take?”
It seems like a silly question to ask, but for a child, the concept of “more” and “less” does not have a strong foundation, but eating 4 cookies is usually better than eating 1 cookie.
So how does this all relate to older learners?
Well, once we get past the initial “learning which numbers are bigger” within 1-10, we find ourselves with a more difficult problem: how do we give a child 1,000 or 10,000 or 100,000 cookies? It’s just not realistic to do. That’s where modelling numbers come in.
Some children find it difficult to decide which number has more when given larger numbers such as “7654” and “7564”. Number modelling breaks down larger numbers into smaller parts that can be represented with 1-10 but have an attached value to them such as ones, tens, hundreds, thousands, and so on. These number models allow us to give children physical representations of larger numbers without having to count out 100 pieces or more each time. Just seeing two abstract values is much more difficult than necessary so number modelling is one way to help your child understand larger number values.
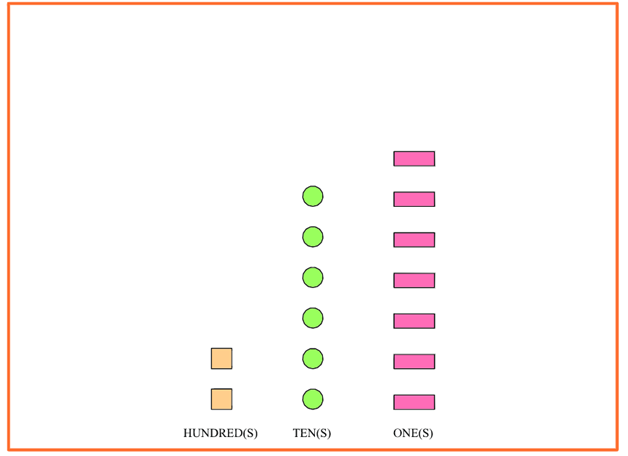
A number model problem, in the third grade, looks something like this:
A number model problem is different across each textbook, school, and teacher. They may use different shapes in the problem, they may use real objects like apples, they may use animals, or they may use different colors. In the case of LI2EI, we opted for different shapes and colors. Each shape represents a specific number. In this case, the yellow squares are “Hundreds”. The green circles are “Tens”. The pink rectangles are “Ones”.
If your child counts each section out they will quickly see that there are:
Two hundreds (200)
Six tens (60)
Seven ones (7)
Putting these numbers together, the representation of the number shown in the number model diagram is 267.
Let’s take a look below at a few different ways your child could solve these number model problems.
Solution 1: Put the numbers together in a line
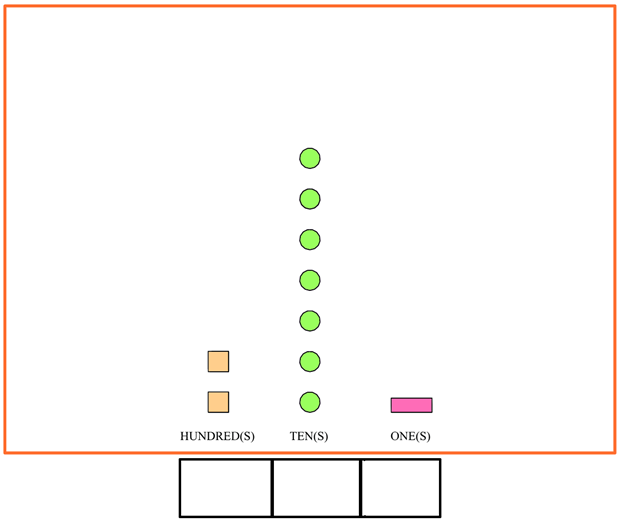
You can have your child set up the problems like how you see below: They draw a box under each number place and count the values in each column, giving you something like this:

With the numbers falling into place on their own, your child can then see the number this diagram represents is 271 by just putting all the numbers together.
Solution 2: Expanded form numbers
Looking at the same problem, another way your child can solve the problem is by using the expanded form of numbers. They can set up the problem almost the same way but adding a few extras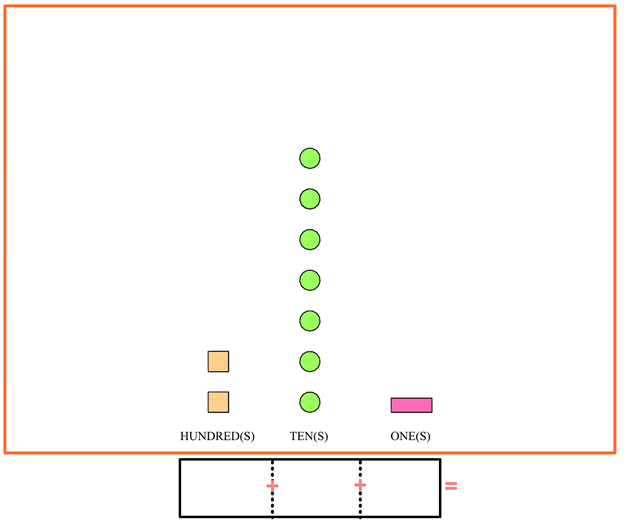
In this version, they are adding together the true value of each represented column. If they fill out the blanks, they’d end up with something like this:
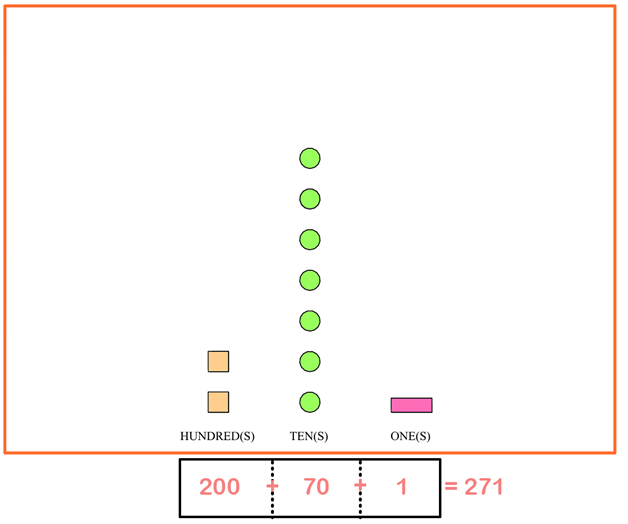
You may be wondering why we should complicate the number model problem. After all, the first solution type is extremely easy and can be solved in seconds. This second solution type is a way for your child to understand 0 values on numbers, adding numbers together with 0 values, and also to help them practice expanded forms of numbers (which was covered in another blog post). Both solutions help reinforce important concepts in math, so it’s good to practice both!
Sometimes, kids will face a problem in math in which big numbers look almost identical. They may see 52323 and 53232 and need to point out which is larger or smaller. Comparing left and right just by looking at numbers can be difficult for some kids, so how should we help them with strategies to find larger or smaller amounts?
The easiest way we’ve found is by adding a few extra steps using the expanded form method.
The expanded form takes everything at a flat 0 place and shows the number as an addition problem. However, our strategy involves not showing an addition problem but putting the values side by side.
In its simplest and non-applied form, expanded form of numbers looks like this:

Expanded form by itself offers only a few benefits, but using the expanded form in number comparisons with our structure can help your kids greatly.
Expanded form starts by taking each digit and adding 0’s at the end of it based on its place value. If the number is in the thousands place, you add three 0’s to the end. If it’s in the hundreds place, you add two 0’s to the end, and so on. Looking at the example below you can see how we’ve broken it down
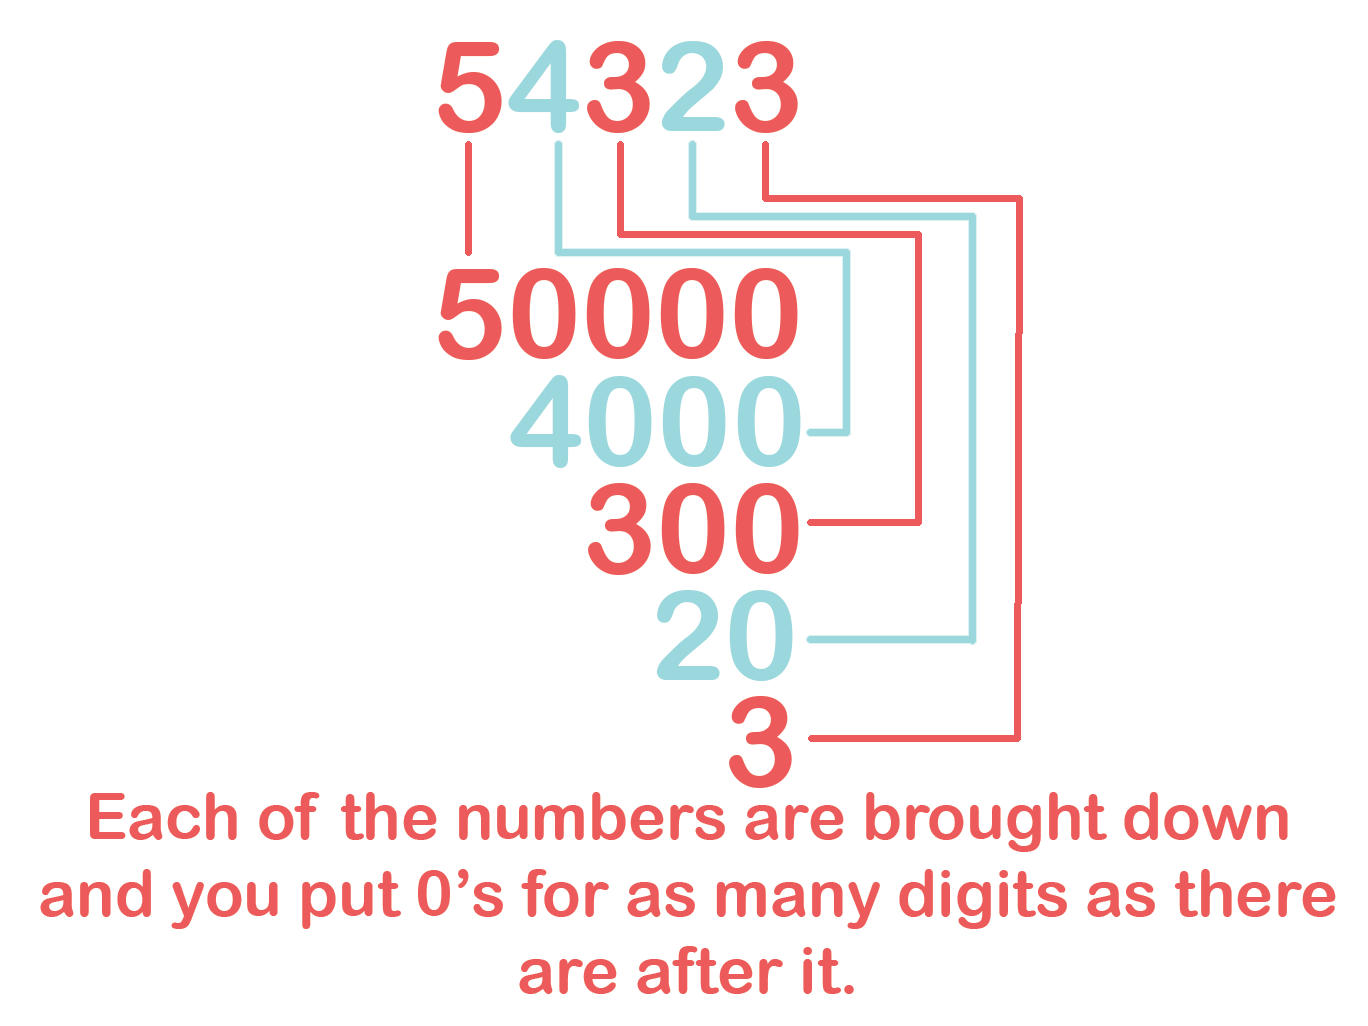
So using this, it’s actually easy to compare numbers that look similar.
By putting the expanded form digits side by side, it’s easier to see where the differences are for your child. Once they are side by side, have your child compare each expanded form value. The FIRST symbol that is not an = sign is going to be the answer for the number comparison.
Check out our worksheet below for more practice!
Expanded Form
Expanded Form Answer Key
Addition is the foundation of arithmetic. Without addition, it becomes very difficult to do many mathematical processes, thereby making it extremely difficult if not impossible to make any progress in learning math.
Addition is a very simple concept – we are taking two groups or more groups, putting them together, and seeing how many there are after. The easiest way to demonstrate addition to your child when they are just learning is to count. It’s a very slow process at first, but it helps to develop your child’s ability to do mental math in the future.
We are easily able to answer 2+2=4 not because we have some mystical ability to add numbers, but as adults we have learned to count by intervals, which is how we are doing addition in our heads when we have that instant reflex of knowing the answer. To develop this skill for your child, there’s a few processes that go into it but to begin with just understanding addition is important.
Teaching your child addition involves using real objects as opposed to just numbers. Real objects help cement value in numbers while also helping your child to visualize addition. Taking for example the problem:
5+3
To solve this problem the phrasing of how you ask your child this problem is extremely important. Since addition involves grouping two sets into a single set, it’s important to make sure the groups are somewhat related. Find some examples of what to do and what not to do below:
Examples That Work
- I have 5 apples and 3 oranges. How many fruits do I have in all?
This example works because apples and oranges are fruits, and you are seeking the total value of all fruits in the example.
- I have 5 chocolate bars in my left hand and 3 chocolate bars in my right hand. How many chocolate bars do I have in all?
This example also works because the items are the same and you are asking how many of that item you have.
Examples that don’t work
- I have 5 cats and 3 bananas. How many animals do I have?
This example doesn’t work. The second part of the question does not ask for the sum of the two things.
- I have 5 cats and 2 dogs. How many dogs do I have?
This example also doesn’t work as the second part of the question is not asking for the sum of the two things.
The take away from these examples should be:
- When you are making a problem into an example, make sure there are either the same object or the same type of object within a set such as fruits, animals, people, etc.
- Asking questions that are not related to addition will not result in the right answer.
Check out our worksheet below to help you practice with your child!
Addition Practice
Our last post on multiplication involved using the multiplication table. Today, let’s go over how to work with your kids to build up their skills to multiply.
At a basic level, multiplication is just addition in less steps. In our head we know 2×2=4, but the process behind it is a little bit more complex when working with children. We always like to push the importance of teaching your children the why and the how rather than just memorizing something as it will help them build new mental processes and problem solving abilities.
If you think about it, if someone told you to do a basic task you’ve never done before, it’d still be difficult. One example I like to use is to ask someone to describe a color to a person with their eyes closed and tell them to name one object using the color you’ve described. If you try this with your friends you’ll find it’s a lot harder than you think even though colors are something so basic. Multiplication is the same for children. When they see a problem like 4×2, for us, the concept is simple as we’ve already developed the multiplicative reasoning processes in our mind. A step by step process is needed to teach children how to multiply. So let’s start on looking at the process.
Let’s take a look at a simple multiplication problem:
3×2=
What does 3×2 really mean? In reality, 3×2 actually means “There are TWO 3’s being added together to make 3+3=” OR “There are THREE 2’s being added together to make 2+2+2=”.
How did we get these math problems? Let’s look closer at the example.
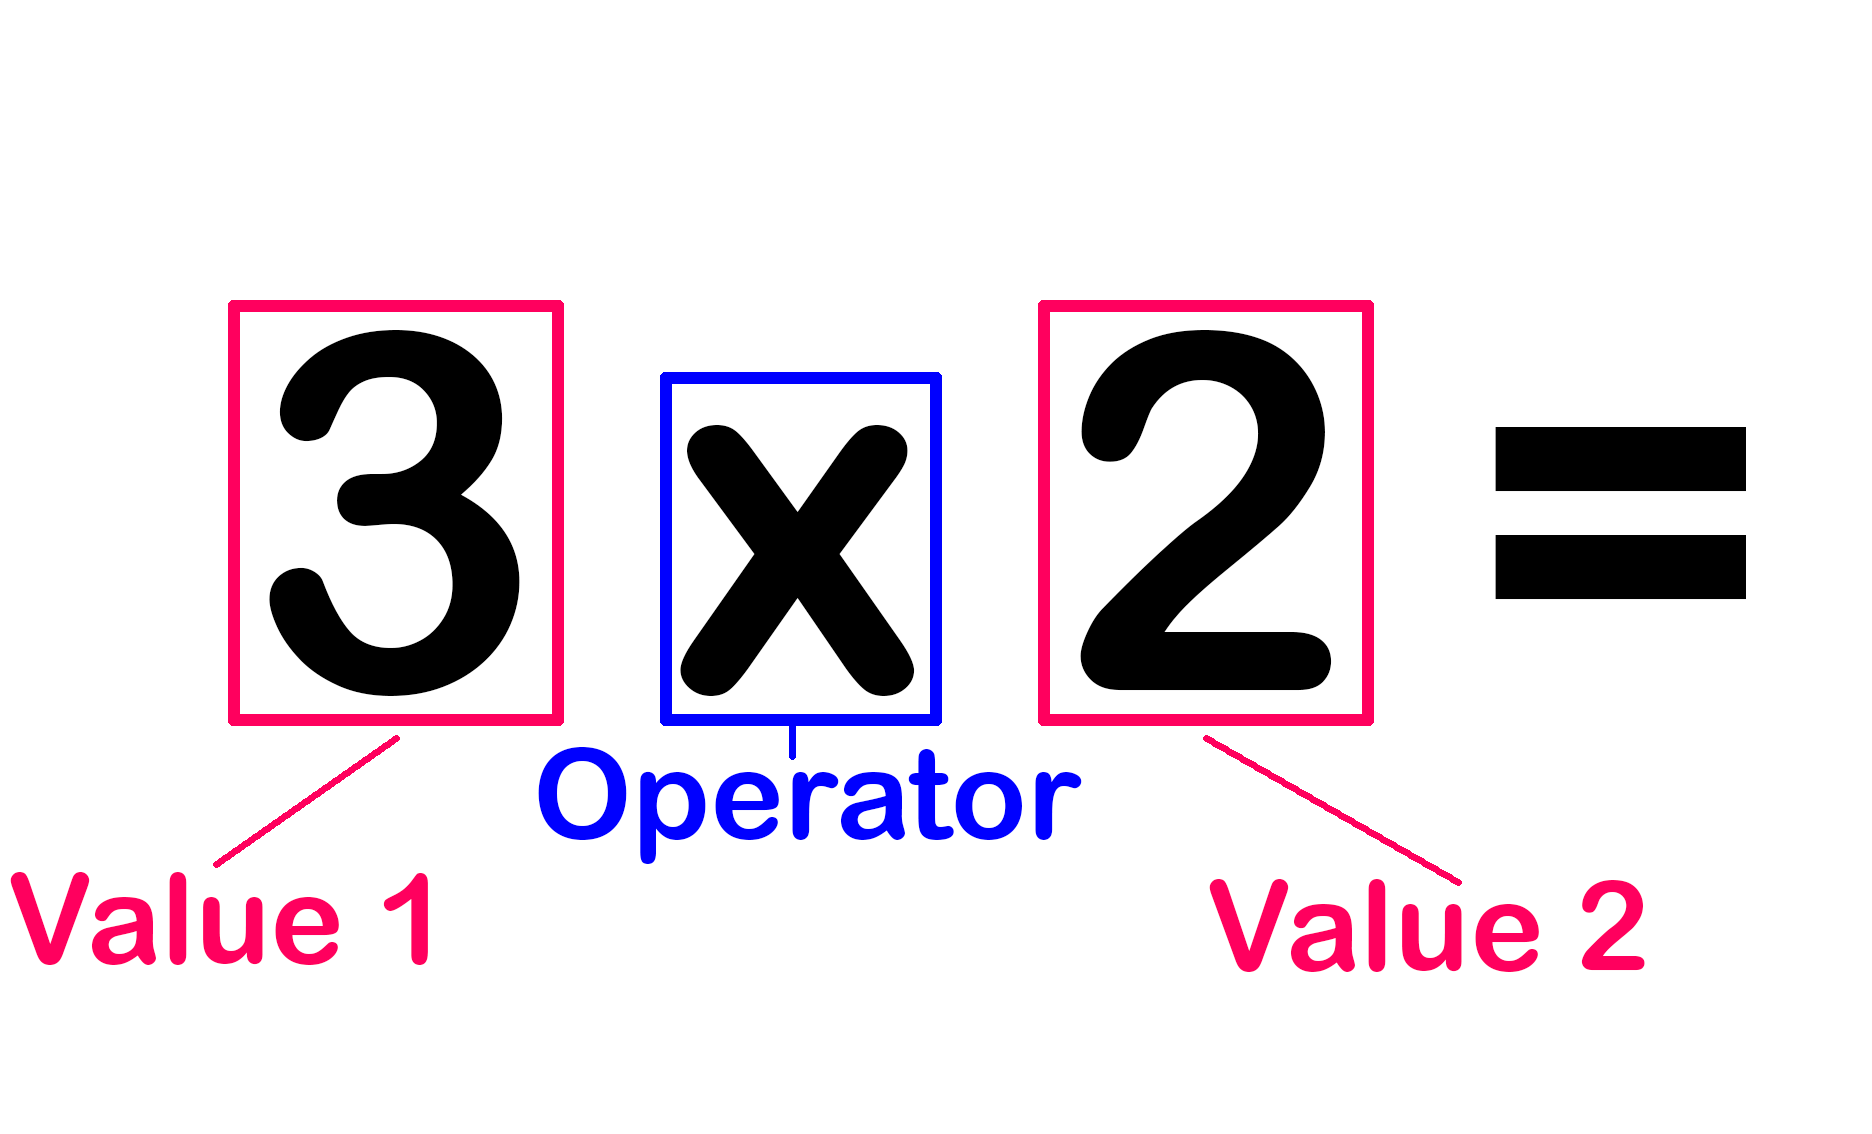
Each multiplication problem has three parts. You have the VALUES which are the amounts being multiplied. You also have the OPERATOR which tells you what mathematical process you are doing.
First, let’s look at the OPERATOR:
In arithmetic, there are a few different operators that stand for multiplication.
It is either an X or a ⋅ between two numbers.
Thus, the problem above could be shown as:
3×2= or 3⋅2=
It’s important to note that these are the same problem to your children as operators do sometimes cause confusion.
Second, let’s look at the VALUES:
In the problem of 3×2= we have two values
3 and 2.
Each value tells you two different things. If for example, we take the “3” as “Value 1”, that tells us the base number. The “2”, being “Value 2” tells us how many times we are adding that number to itself.
Since we have 3 as our first value, and 2 as our second value, we know that we are adding the number “3” two times to itself, giving us the problem 3+3= (which is the same as 3×2).
If we decide to reverse the values and call “3” as “Value 2” and “2” as “Value 1”, then we know that we are adding the number “2” three times to itself, giving us the problem 2+2+2= (which is also the same as 3×2).
The important process is to understand that multiplication is just telling someone how many times a number should be adding to itself.
So now, let’s break this down into an easy way to explain to your child.
Using the problem 3×4. You can tell your child to pick a number from the problem. That will be their base number. After they have chosen their first number, let them write down the first number as many times as the second number tells them to.
Take a look at this example video below
The important thing to reinforce with your children is to make sure that they recognize they are NOT bringing the second number down, but instead using it as a counter for how many times the first number is adding it to itself.
Check out our printable PDF worksheet below for more practice with your child!
Multiplication Worksheet
Multiplication Worksheet – Answer Key Multiplication Worksheet